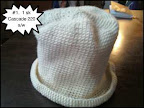
There is a restaurant where each person in the entire family has a meal he/she thoroughly enjoys. Even the two littlest ones have a meal they enjoy sharing. It's a half-hour's drive from home, but that's OK. We went there today, so I was able to finish HAT 21 on the way to, while waiting, and the way home. It's Wool-Ease Chunky in color W****. I used 55 stitches and did a 2x2 spiral rib for the cuff, then stockinette for the stand, and "pie wedge decreases" for the top.
What do I mean by "pie wedge decreases"? They make a straight-line, not swirly, hat top. It looks more like a commercially made cap than a hand-made cap. Why? Because a commercially made cap is usually sewn from knit yardage. You can't sew the swirly top. (At least you couldn't sew it easily. Or I haven't seen instructions/pattern for doing so.) Instead, you cut pieces that are like pie wedges with rounded sides. Then you sew them with a small seam allowance. The result is pie slices that curve to cover a head. Like darts. See photo. The very tip-top looks like a star instead of a pinwheel.
Some folks LOVE "Magic Loop" knitting. Some folks despise it. I despise DPNs and am SO HAPPY that I learned Magic Loop (ML). You can tell a ML junkie when you see one; it's the knitter who finds himself or herself doing ML even on a 16" or 9" needle. Been there, done that, didn't mind as it was only a few rows any way. Tonight, on the way home from the restaurant, I finished the hat top doing ML on a 16" needle. Who says you need a 27"+ needle for ML??? Only someone who doesn't appreciate wrist cramp!
To those who'd like to know how to do pie wedge decreases instead of swirly pinwheel decreases, I type it out.
Divide the number of stitches by the number of pie wedges you want.
I had 55 stitches, and that has few factors. So 5 wedges was my choice.
That means each wedge would be 11 stitches.
Here are how the 11 stitches are done:
k1, k2tog, k6, ssk. Repeat around.
Knit one row even.
Now your wedges are only 9 stitches wide, as you decreased two stitches above. So:
k1, k2tog, k4, ssk. Repeat around.
Knit one row even.
Now your wedges are only 7 stitches wide, as you decreased two stitches above. So:
k1, k2tog, k2, ssk. Repeat around.
Now your wedges are only 5 stitches wide, as you decreased two stitches above. So:
k1, k2tog, ssk. Repeat around.
Then I cut the yarn with a tail and drew through the remaining 15 stitches twice. Darned in ends.
Subscribe to:
Post Comments (Atom)
Crochet Basic Roll-Brimmed Hat
 |
| From 310 Hats |
Worsted weight yarn
I hook (5 mm)
Marker


No comments:
Post a Comment