Friday, July 6, 2012

An amazing collection of free hat patterns

I confess: I've become a GarnStudioDrops Design and DropsYarn junkie. It's all E3's fault. She pointed me to a mitten pattern. I fell in love*. Consequently, I've been hanging out in the Drops pattern collection and archive ever since.

Here, friends, is enough hat inspiration to keep you, your needles, and your hooks busy for a year. Just click.  The link is set for the American and English versions of the patterns, but feel free to switch to a different language and different version of instructions. Nearly every pattern they offer is offered in many different languages. The link is also sorted by yarn gauge. Feel free to sort on a different attribute.

*I still haven't mastered the tension on multi-yarn knitting. I haven't finished that first pair of mittens. But I've made many other of their patterns!

No comments:

Post a Comment

Crochet Basic Roll-Brimmed Hat
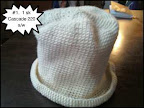
From 310 Hats


Worsted weight yarn
I hook (5 mm)
Marker


  • Chain 2
  • 6 sc in 2nd chain from hook. Place marker in last stitch.
  • 2 sc in each sc (12). Move marker.
  • (1 sc in first stitch, 2 sc in next stitch), repeat around (18 sc). Move marker.
  • (2 sc in each of first 2 sts, 2 sc in next stitch), repeat around (24 sc). Move marker.
  • (3 sc in ea of first 3 sts, 2 sc in next stitch), repeat around (30 sc). Move marker.
  • Continue in this manner for 13 or 14 rounds (increasing the number of scs before the increase by 1 each round) until your radius is about 3", diameter about 6", and circumference about 18". (78 scs or 84 scs). This should make a nice flat disc, which is the hat top.
  • Work even without increasing. It will start making a bowl shape. Continue even until the depth is about 6". It needs to be long enough and and big enough around to cover a Kindergarten-age child's head and ears.
  • To create a rolled brim, increase the stitches by 50%: (1 sc, 2 sc in next stitch) repeat around.
  • Work a few rounds even.
  • Slip stitch around to give a nice tight, neat edge.
  • Cut yarn. Work in ends.
  • If the hat is too "airy", you can weave colored yarns through the stitch spaces. Colored yarns will be very decorative.

  •